This is a series of blogs exploring the implementation of User Space Thread in C++. A user-space thread is managed by the userspace code with very minimal involvement of the Kernel APIs. This blog will not discuss the pros and cons of User Space Thread, nevertheless, you might want to check this. I believe that knowing the machinery of User Space Thread implementation will help us to understand the new Coroutine feature released in C++20 (Talk from cppcon 2015). I am planning a separate post for each key concept leading to a full-fledged User Space Thread library. So, here is the plan:
-
This blog - Register Manipulation to switch Stack.
-
Basic Scheduler at userspace
-
Pre-emption using timer and signals
-
Multiple threads and a better scheduler
-
Mapping User Space Threads to OS Threads
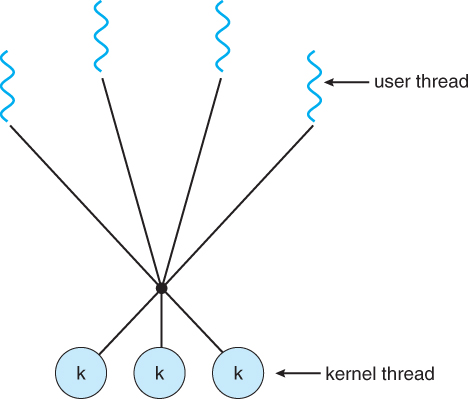
Point 5 refers to the following design (Image from Galvin’s OS Book)
Throughout the entire series of blogs, I will use x86_64 calling convention when interacting with registers from C++ code, simply because my machine architecture is x86_64. Later we can port the code to another ABI.
I named the title of the blog Tour of Registers. As we will see, the essence of User Space Thread is nothing but careful handling of the registers set given by architecture in a specific pattern.
The code for a User Space Thread can be written in C language also. I am using C++11 just because of its backward compatibility and out of self-interest.
Let us start by introducing the basic program execution and role of %rsp and %rip registers.
-
%ripregister points to the next instruction. -
%rspregister points to the top of the stack.
In the diagram below, function F is executing and %rip holds the address of the next instruction whereas %rsp holds the top address of the stack. As the stack grows downward, the value of %rsp decrements when new items are being pushed as a result of the current or next instructions of F.
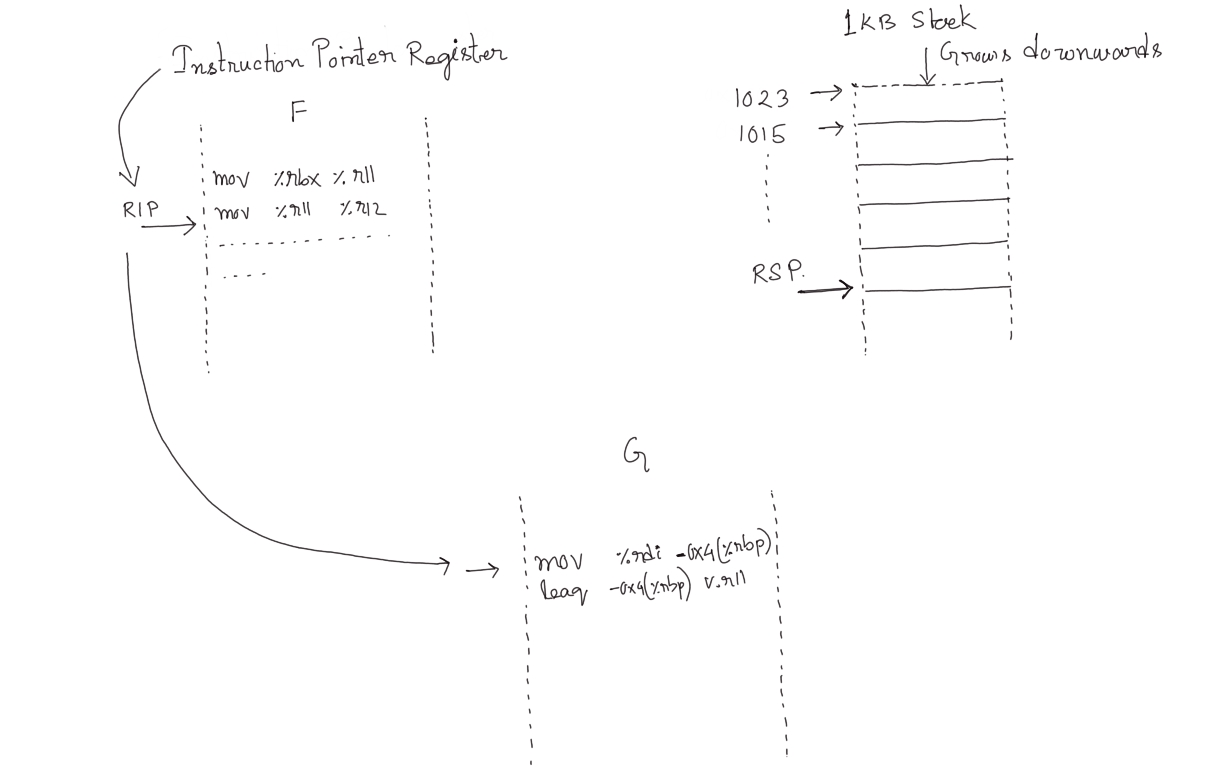
Kernel threads (or OS Threads) have their stack memory area so that their local state/variables do not collide. Similarly, a User Space Thread must have its stack memory. But instead of OS doing the stack management, the programmer has to write code to allocate stack memory and provide it to a newly spawned User Thread **. When we want to spawn a User Thread to run a function G, we need to allocate a sufficient memory area and point the %rsp register to the higher address of the allocated space. In the following diagram %rsp needs to be loaded with the value of stack top.
But to run the code from the G function we need to manipulate the %rip register also, otherwise, the CPU will keep doing whatever it was execting earlier (for example F’s code in the above image). The register %rip can not be accessed directly and we have to take help from some other instructions that will make %rip point to the start instruction of function G. Once %rip and %rsp are properly set for function G, then G can run in the context of a independent thread in its own stack space and a shared heap area, almost like an OS Thread.
To modify the %rip register we have a couple of option:
-
Use of Jump Or Call Instruction (Direct)
-
Use Return instruction. (Indirect)
We will spend most of the time explaining Point 2. But before that we will see Point 1
Let’s see how we can use jmp or call instruction to make %rip point to the starting instruction of G.
In the following code, we used inline assembly to setup the user thread context, mainly stack pointer.
#include <iostream>

const unsigned int stackSize = 1 << 20;

void func() {

     // some dummy local variable
     int x[10];
     std::cout <<"func() called" << std::endl;

     // why not return from here ??
     // we will check this point in the next section
     exit(0);
}

int main() {

     // allocate 1 MB memory on heap
     // we will use for the child thread to use it as stack
     char * heapMemory = new char[stackSize];

     // get the highest address of the allocated memory area
     // that will be initial stack top for the child thread
     uint64_t Stack = uint64_t(heapMemory + stackSize);

     std::cout <<"Initial Stack top addr = "<<(void*)(Stack) << std::endl;

     uint64_t fptr = (uint64_t)func;

     asm volatile(

          // store function pointer to %r8
          // jmp or call instruction will use it to jump
          "movq %[_func], %%r8\n\t"

          // store input stack address to %r9
          "movq %[_rsp], %%r9\n\t"

          // Now load the actual %rsp
          "movq %%r9, %%rsp\n\t"


          // then jump to the value stored in r8 -> func
          // We can use call instruction also
          // callq *%%r8

          "jmp *%%r8 \n\t"


          /* Output variable section (Empty)*/
          :
          /* Input variable section */
          :[_func] "m" (fptr) , [_rsp] "m" (Stack)

          /* cloberred register list : see below */
          :"r8","r9"
     );

     /**clobbered list: => The compiler avoids using a register in this list
      * as an input or output operand, or using it to store
      * another value when the assembly code is executed.   */

     /*control will not reach here, due a problem in our code
     we will fix it in the next section */
     std::cout <<"Main again!" <<std::endl;
     delete[] heapMemory;
}
The instruction movq %[_rsp], %%r9 loads the newly allocated stack pointer to %r9 register and then finally it is being loaded to %rsp register.
We can verify the new stack address using gdb:
>>> print/x Stack
$2 = 0x7ffff7fd1010

func:

=>0x0000555555554a4a  func()+0  push   %rbp
  0x0000555555554a4b  func()+1  mov    %rsp,%rbp
  0x0000555555554a4e  func()+4  sub    $0x30,%rsp

// At this point GDB output

func () at first.cpp:5
5   void func() {
>>> print $rsp
$3 = (void *) 0x7ffff7fd1010
The jmp instruction loads the %rip register with the next instruction address, which is in this case is the start address of G.
Once the jmp *%%r8 instruction is executed, CPU starts executing the instructions of G and uses the newly allocated stack area. We just spawned a child thread !!.
Here is the output:
Initial Stack top addr = 0x7ffff7fd1010
func() called
We did not address the issue of returning to the main function till now and exit(0) is used in the func function. You may try to change the exit(0) to return, but the program will crash.
It is obvious by now that the above program is not following the usual method of calling a function, where it is possible to arrive at the start of pending instruction of main when control returns from function func. In this case, are manually calling jmp instruction but did not remember the return address inside main.
The main idea is, the CPU uses a finite set of registers to execute a process or a thread. These registers also serve as the overall state of the thread. These registers get used across OS threads and function calls. Therefore the CPU saves these registers in a specific kernel data structure. The Kernel and the CPU together context switch to any ready thread and load its registers with the saved values from the last time it swapped this thread.
Now all these nice things that kernel does for us, we have to do for the user thread instead. We will need to use existing instructions provided by x86_64 architecture, specifically call and ret instruction.
Call and Ret instruction when calling a function from another function
When the compiler uses these two instructions? We will see below with the help of a simple program and its associated assembly.
Let’s suppose we are inside main and about to call func directly using func().
#include <iostream>
void func() {
    int x[10];
    return;
}
int main() {
    func();
}
The compiler in x86_64 architecture will emit the following instructions for main function.
   0x0000000000000f59 <+0>: push   %rbp
   0x0000000000000f5a <+1>: mov    %rsp,%rbp
   0x0000000000000f5d <+4>: callq  0xe4a <func()>
   0x0000000000000f62 <+9>: mov    $0x0,%eax
   0x0000000000000f67 <+14>:    pop    %rbp
   0x0000000000000f68 <+15>:    retq
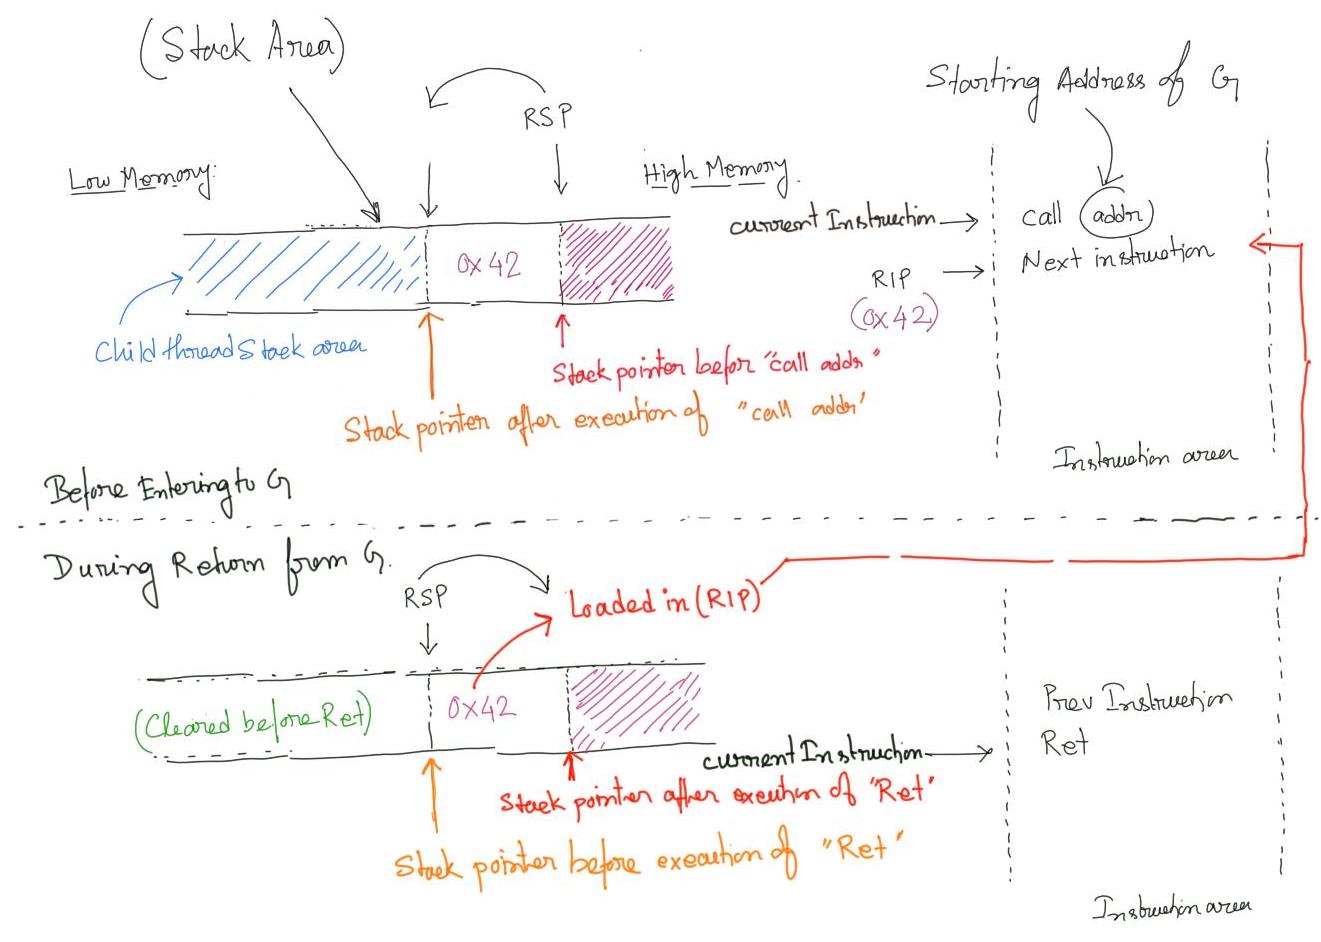
Notice the callq instruction makes the instruction pointer jumps to func(). It is the 64 bit version of the call instruction. But the call instruction involves two implicit steps. First, the return address (for this function) is pushed, and then the actual jump to the required function location/address.
     // the return address is pushed onto the stack and
     push ret_address  // ret_address -> 0x0000000000000f62
     // Assume that the value of %rsp at this point is 0xAB
     jmp func
The callee function is going to use the stack after completion of the above two steps. When the func() almost completes its execution, the CPU will make sure that the stack pointer is restored (%rsp becomes 0xAB, this is done using leaveq instruction, check more here).
Lets see the dissassembly of func() also:
>>> disassemble func
Dump of assembler code for function func():
   0x00000000000007aa <+0>: push   %rbp
   0x00000000000007ab <+1>: mov    %rsp,%rbp
   0x00000000000007ae <+4>: sub    $0x30,%rsp
   0x00000000000007b2 <+8>: mov    %fs:0x28,%rax
   0x00000000000007bb <+17>:    mov    %rax,-0x8(%rbp)
   0x00000000000007bf <+21>:    xor    %eax,%eax
   0x00000000000007c1 <+23>:    nop
   0x00000000000007c2 <+24>:    mov    -0x8(%rbp),%rax
   0x00000000000007c6 <+28>:    xor    %fs:0x28,%rax
   0x00000000000007cf <+37>:    je     0x7d6 <func()+44>
   0x00000000000007d1 <+39>:    callq  0x670 <__stack_chk_fail@plt>
   0x00000000000007d6 <+44>:    leaveq

   // just before returning from the function func()
   // The value of %rsp at this point is also 0xAB
   0x00000000000007d7 <+45>:    retq  // retq is the 64 bit version of ret instruction
The ret instruction pops the top of the stack and loads the value into the %rip register. After the ret instruction, the instruction pointer points to the return address that we pushed in main function before jumping to the func() function.
Therefore with the combination of call followed by ret instruction helps the CPU to arrive at the correct place after the callee function returns. In this example, we don’t switch stacks and remain in the same stack across function calls (with different offsets of course!). The following diagram represents the call and the ret instruction mechanism which saves and restores %rsp and %rip. registers.
When we switch stacks (due to explicit thread switching), the return address should be pushed onto the old stack before jumping to the callee thread. The old stack pointer also needs to be stored in some context (We will define context later). Just before return from the callee function %rsp value needs to be restored from the old context and ret instruction needs to execute to bring the %rip to the previous thread.
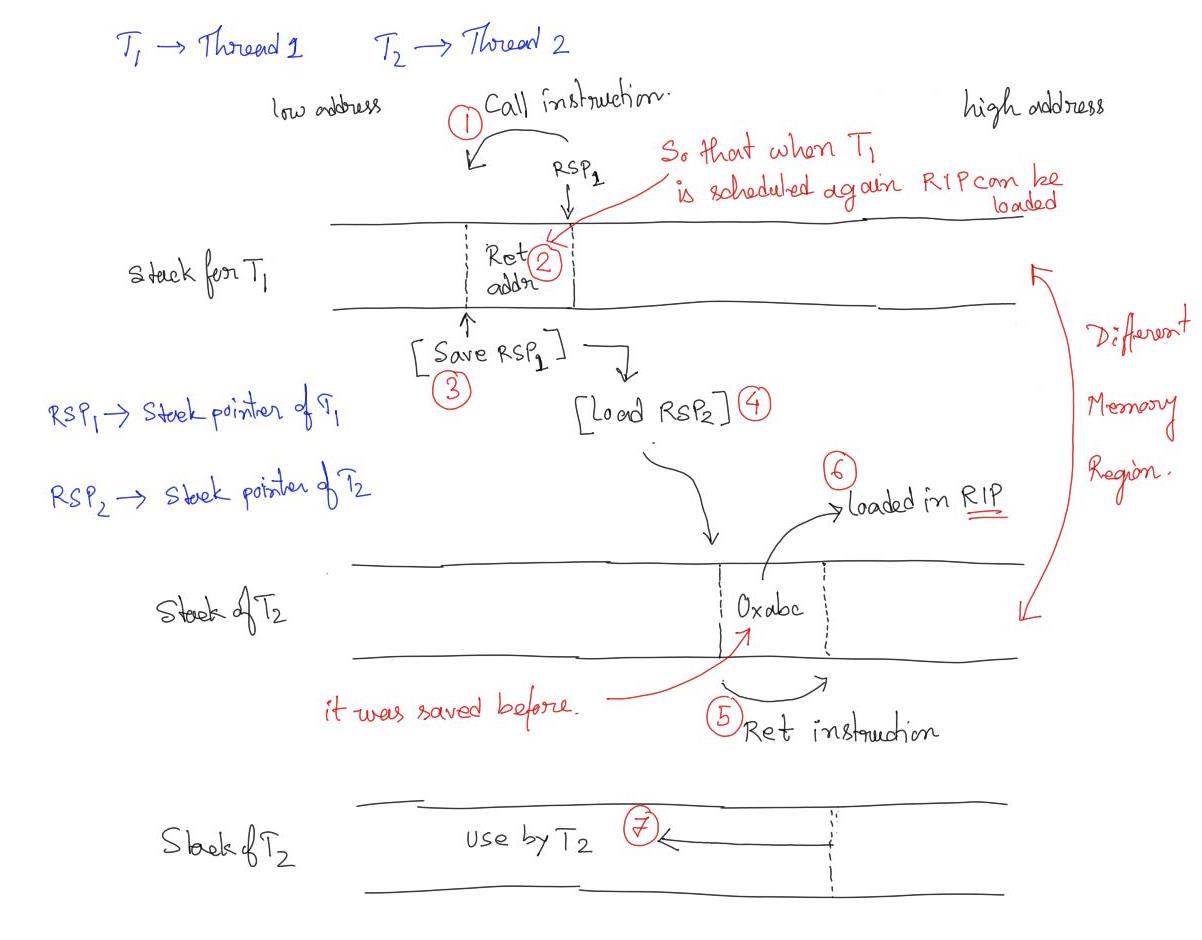
The following diagram considers two threads (any thread, user-level or OS level). Assume that these threads are non-pre-emptive and co-operative, which means they will yield control to another thread. In the below diagram Thread 1 yields control to Thread 2. The whole process takes place in 7 steps.
-
Thread
1should call some utility function that saves and restores contexts. -
Due to the above invocation in the Thread
1’s context, the return address is pushed onto the stack of Thread1. -
The utility function will save the
%rspvalue for Thread1. -
The utility function will also load the
%rspvalue for Thread2from another saved context -
The utility function will also issue a
retinstruction -
Due the step
5, the return address of Thread2is loaded in%ripregister -
Thread
2resumes its execution.
We will define the utility function in a assembly files and call it ContextSwitch.S.
All the above steps call also be depicted as follows:

Also, we have not properly defined the term context. We assumed that %rsp value is the only context required across function calls. Well, that is not the case for x86_64 architecture. The x86_64 has a set of registers which values must be preserved across function calls. In other words, a function A calling another function B can expect those registers to contain the same values after function B returns as they had when function B was called because the callee (B) saves and restore those values.
Those registers are %rsp,%rbp, %rbx, %r12, %r13, %r14 and %r15. We will define a struct to contain all the above registers and will call it the context for our user thread.
struct Context {
    uint64_t rsp;
    uint64_t r15;
    uint64_t r14;
    uint64_t r13;
    uint64_t r12;
    uint64_t rbp;
    uint64_t rbx;
};
If we have two user-level threads, we need to have two Context variables to save their contexts.
Let’s code the entire discussion in two files, main.cpp and ContextSwitch.S. The objective of the program is to switch to a different user level thread from the main thread and then return to main safely.
/* Ubuntu 18.04 x86_64 */
/* Compiler gcc version 7.5.0 */
/* Linux 5.6.2 */
/* g++ -g -std=c++11 main.cpp ContextSwitch.S */

#include <iostream>

// 1 MB User Space Stack is enough for now
const int stackSize = 1 << 20;

// A Set of Registers to Represent the Context of Thread
// These register values are presered across function calls
// in x86-64 ABI
struct Context {
    uint64_t rsp;
    uint64_t r15;
    uint64_t r14;
    uint64_t r13;
    uint64_t r12;
    uint64_t rbp;
    uint64_t rbx;
};

// This is a function defined inside an Assembly file
// According to x86-64 ABI convention
// %rdi == curr and %rsi == next
extern "C" void ContextSwitch(Context *curr,Context *next);

//Let's take only two Thread
static struct Context Main;
static struct Context Child;

// Child thread is going to run this function
void func() {
    std::cout <<"[child] func completes its execution" << std::endl;
    // at present we have to write the following line
    // to return safely to main
    ContextSwitch(&Child,&Main);
}

int main() {
    // this is main user thread

    // allocate stack memory for the Child Thread
    char * childStack = new char[stackSize];

    // the following line we have to do it manually
    // to pretend that before this main thread is scheduled
    // the Child thread was running (which is not actually)
    // that's why we have to manually save the func pointer
    // in the child thread's stack top

    // func() will be pointed by rip just before ContextSwitch() returns below
    *(uint64_t *)&childStack[stackSize -  8] = (uint64_t)func;

    // when ContextSwitch tries to return from the call below,
    // rsp value will be loaded in rip due to ret call
    // which makes rip == addr of func()
    Child.rsp = (uint64_t)&childStack[stackSize - 8];

    std::cout <<"[main] Child user thread context ready!" << std::endl;

    // Just before the next call, the return address for main is pushed
    // onto the main thread's stack
    ContextSwitch(&Main,&Child);

    std::cout <<"[main] scheduled again!" << std::endl;
    delete[] childStack;
}
.globl ContextSwitch    // make the Symbol ContextSwitch available in link time
ContextSwitch:

        // According to x86_64 calling convention
        // first argument to ContextSwitch is stored in %rdi
        // second argument to ContextSwitch is stored in %rsi

        // Therefore %rdi -> addrss of Main Conext struct
        // Use Offset addressing to store each registers to Main Context
        movq     %rsp, 0x00(%rdi)
        movq     %r15, 0x08(%rdi)
        movq     %r14, 0x10(%rdi)
        movq     %r13, 0x18(%rdi)
        movq     %r12, 0x20(%rdi)
        movq     %rbp, 0x28(%rdi)
        movq     %rbx, 0x30(%rdi)

        // Therefore %rsi -> addrss of Child Conext struct
        // Use Offset addressing to load each registers from Child Context
        movq     0x00(%rsi), %rsp
        movq     0x08(%rsi), %r15
        movq     0x10(%rsi), %r14
        movq     0x18(%rsi), %r13
        movq     0x20(%rsi), %r12
        movq     0x28(%rsi), %rbp
        movq     0x30(%rsi), %rbx

        ret      // rip is loaded with [rsp,rsp + 8]
The line *(uint64_t *)&childStack[stackSize - 8] = (uint64_t)func; is important. The thread from which the child thread is created has to perform this operation to store the required function pointer on the callee thread’s stack. Because the program control is not starting from the child thread.
Other details are trivial and commented. Output of the above code:
// Compile it
>> g++ -g -std=c++11 main.cpp ContextSwitch.S -fsanitize=address -fsanitize=leak

[main] Child user thread context ready!
[child] func completes its execution
[main] scheduled again!

// valgrind check for memory leak
>> g++ -g -std=c++11 main.cpp ContextSwitch.S
>> valgrind --leak-check=full --show-leak-kinds=all --track-origins=yes ./a.out

==29667== HEAP SUMMARY:
==29667==     in use at exit: 0 bytes in 0 blocks
==29667==   total heap usage: 3 allocs, 3 frees, 1,122,304 bytes allocated
==29667==
==29667== All heap blocks were freed -- no leaks are possible
So, we completed the user Thread switching. But we have to explicitly write the ContextSwitch(&Child,&Main) in the callee thread. Context Switch is a low-level detail and the programmer who is using a user thread package need not worry about internal details. In the next blog in this series, we will discuss cleaning up this ContextSwitch mechanism and handle more than two threads.
** There is very interesting paper on cooperative_task_management. I am currenly reading this paper to know alternate design option for the Step 5 of our project. See you in the next blog!.